Flight school: Cessna 172#
The Cessna 172 is the classic trainer. This is how our script flies it from Erfurt to Leipzig, and how you can fly it yourself: with key data, instruments, checklists and callouts as in a real flight school. The values come from the flight script and were checked in flight; the script flies the traffic pattern following the usual practice for light aircraft. For a real aircraft its flight manual always applies.
Key data#
Value |
Cessna 172 in the script |
|---|---|
Rotate (VR) |
55 kt |
Climb |
75 kt (best rate of climb Vy), full power |
Cruise |
100 kt at 3500 ft above sea level |
Approach with flaps 10° |
75 kt, descent about 400 ft/min |
Final with flaps 20° |
68 kt from 3 nm before the runway |
Decision |
200 ft above ground |
Bank in turns |
at most 20° |
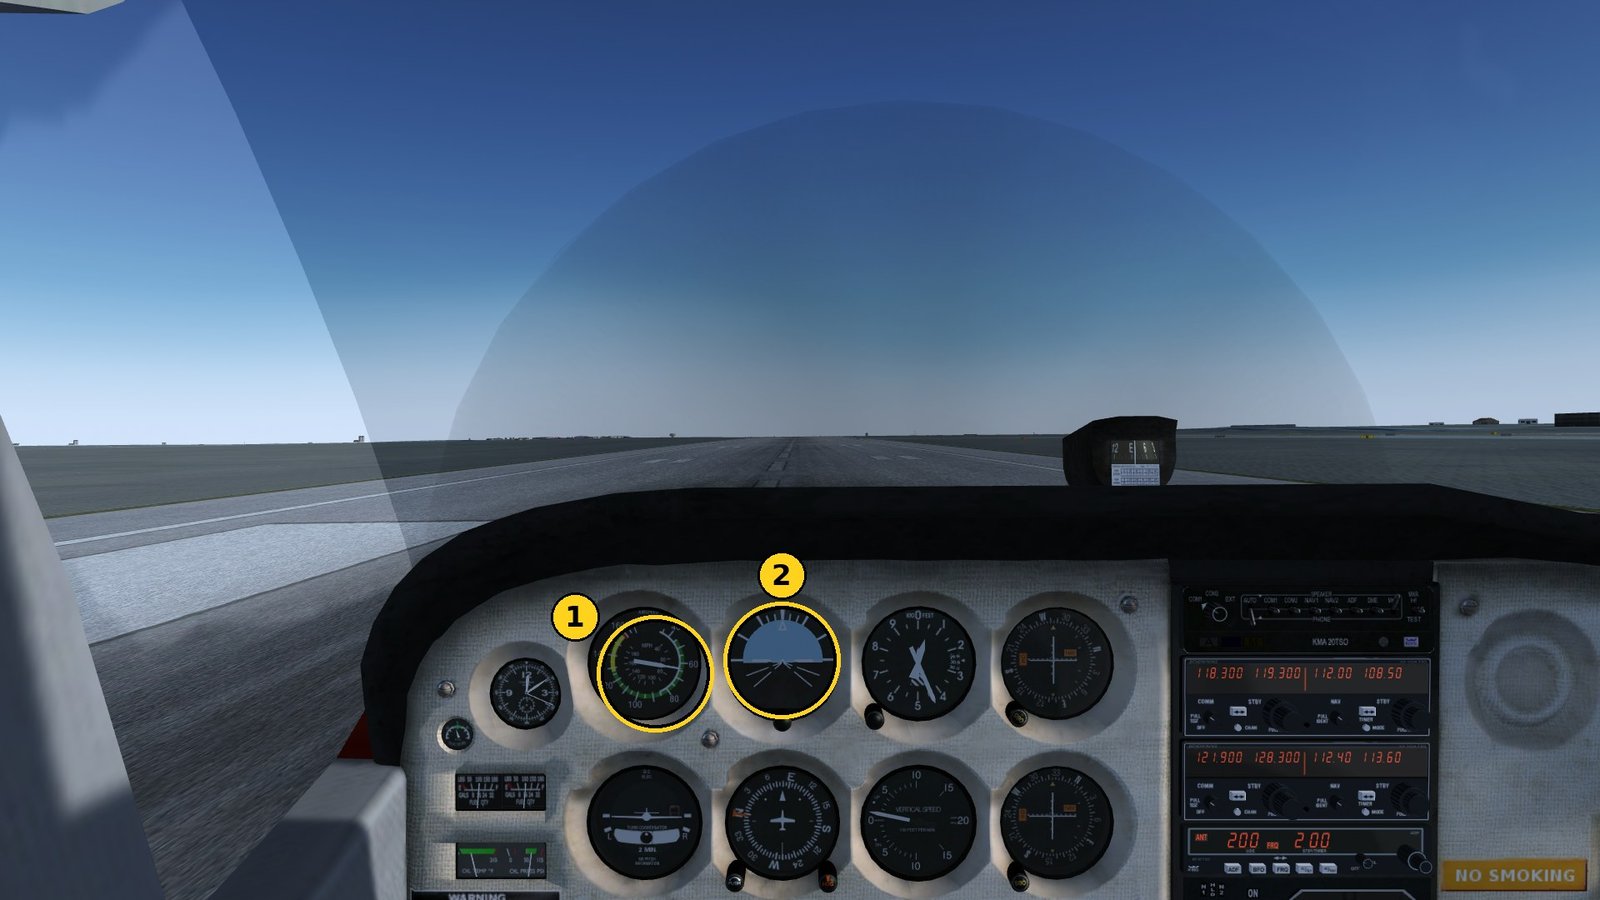
The coloured arcs on the airspeed indicator show the limits: white is the flap range, green normal operation, yellow only in smooth air, the red line the maximum speed.
Instruments#
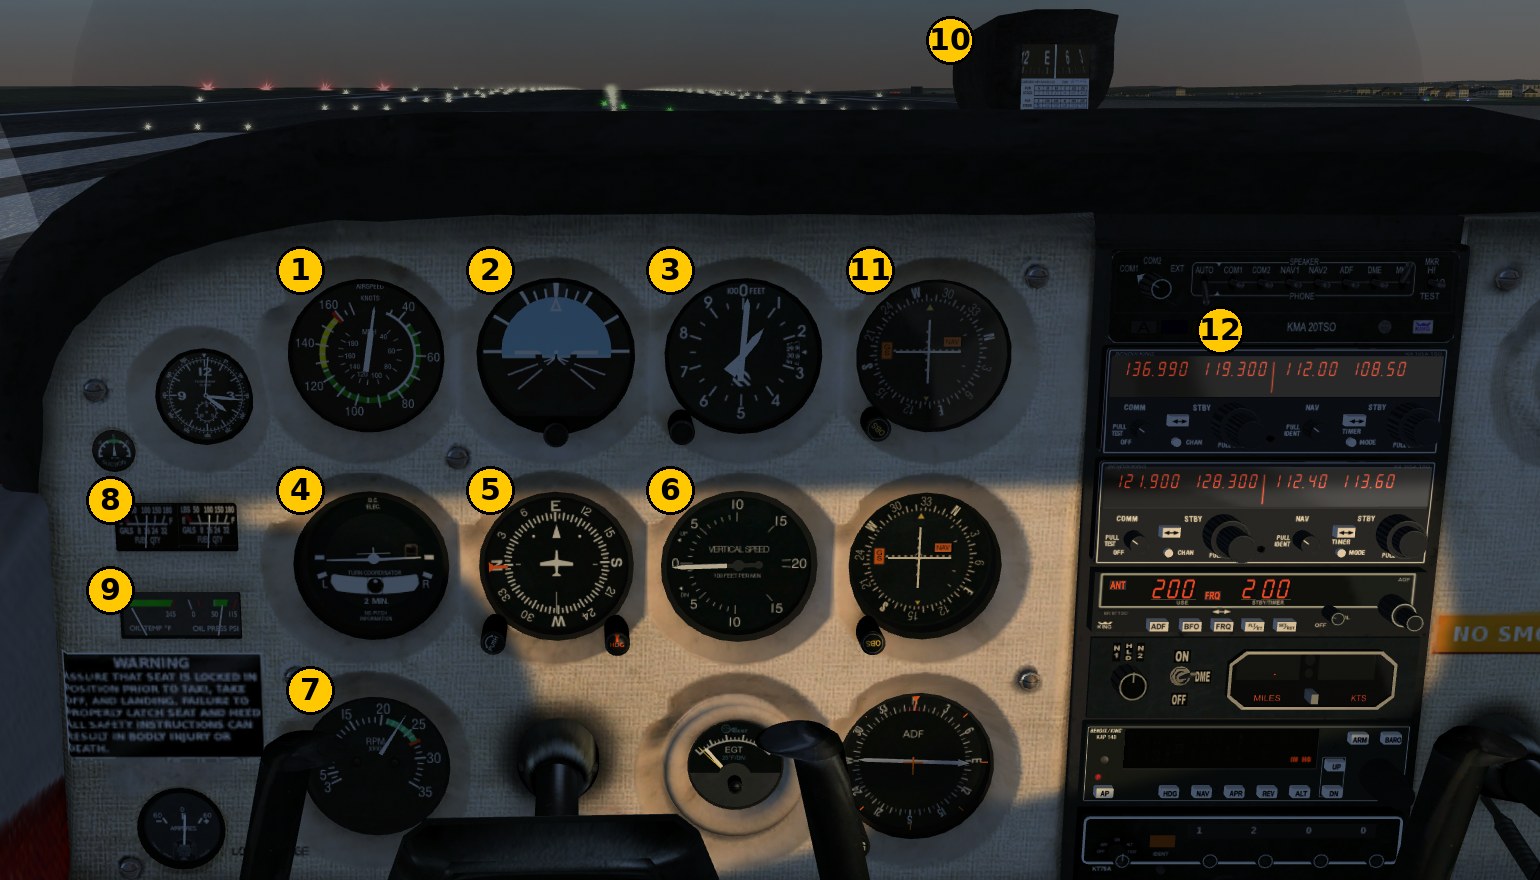
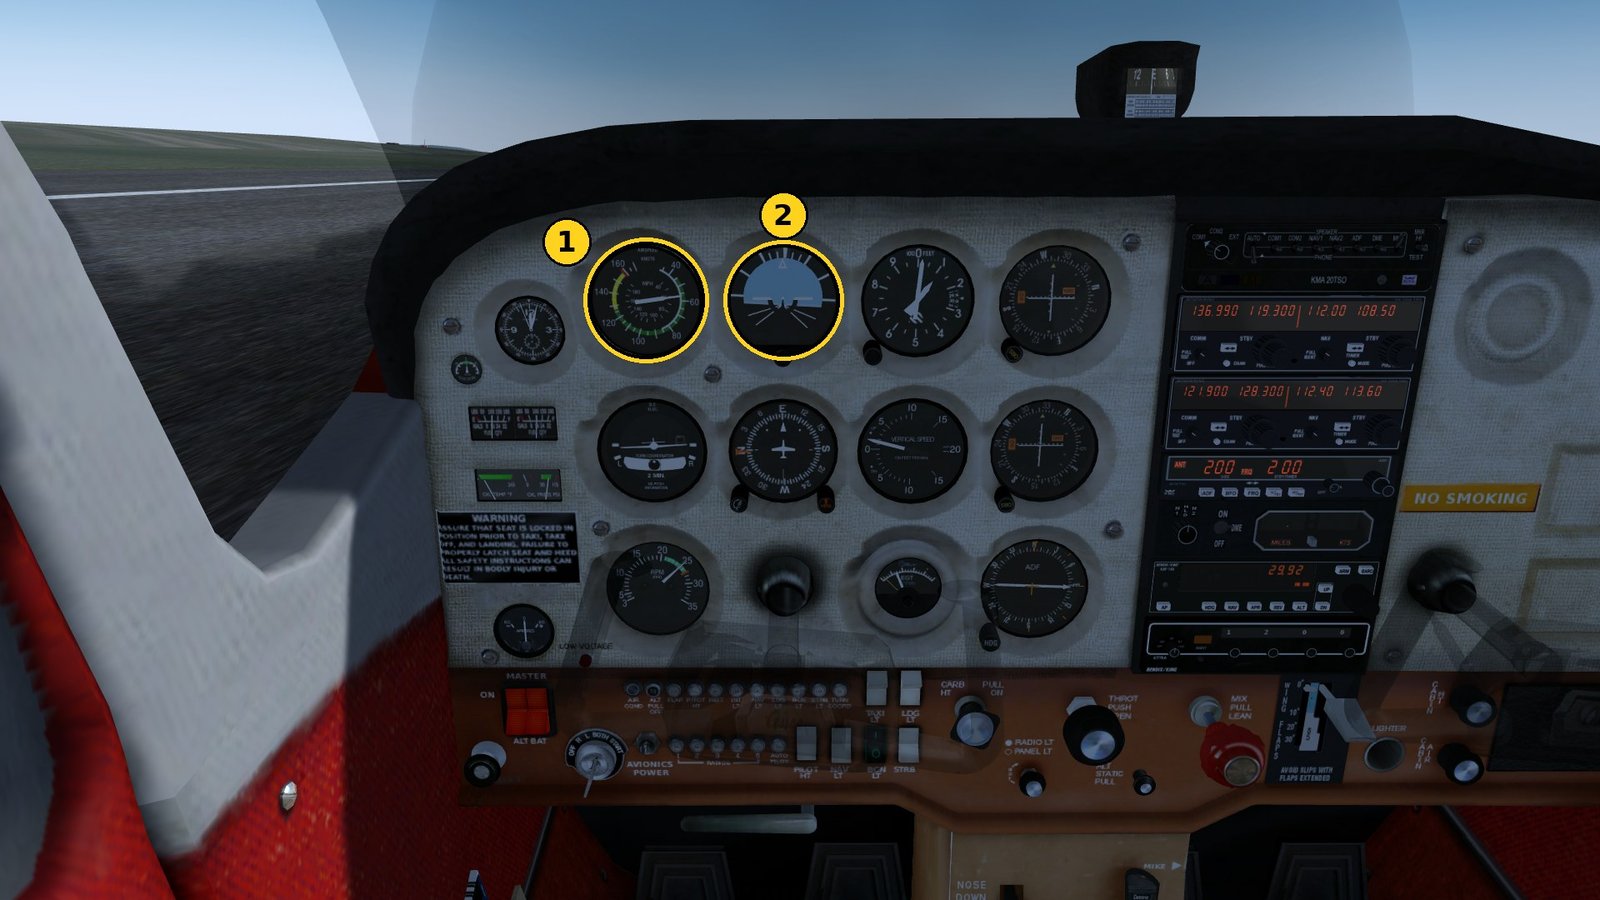
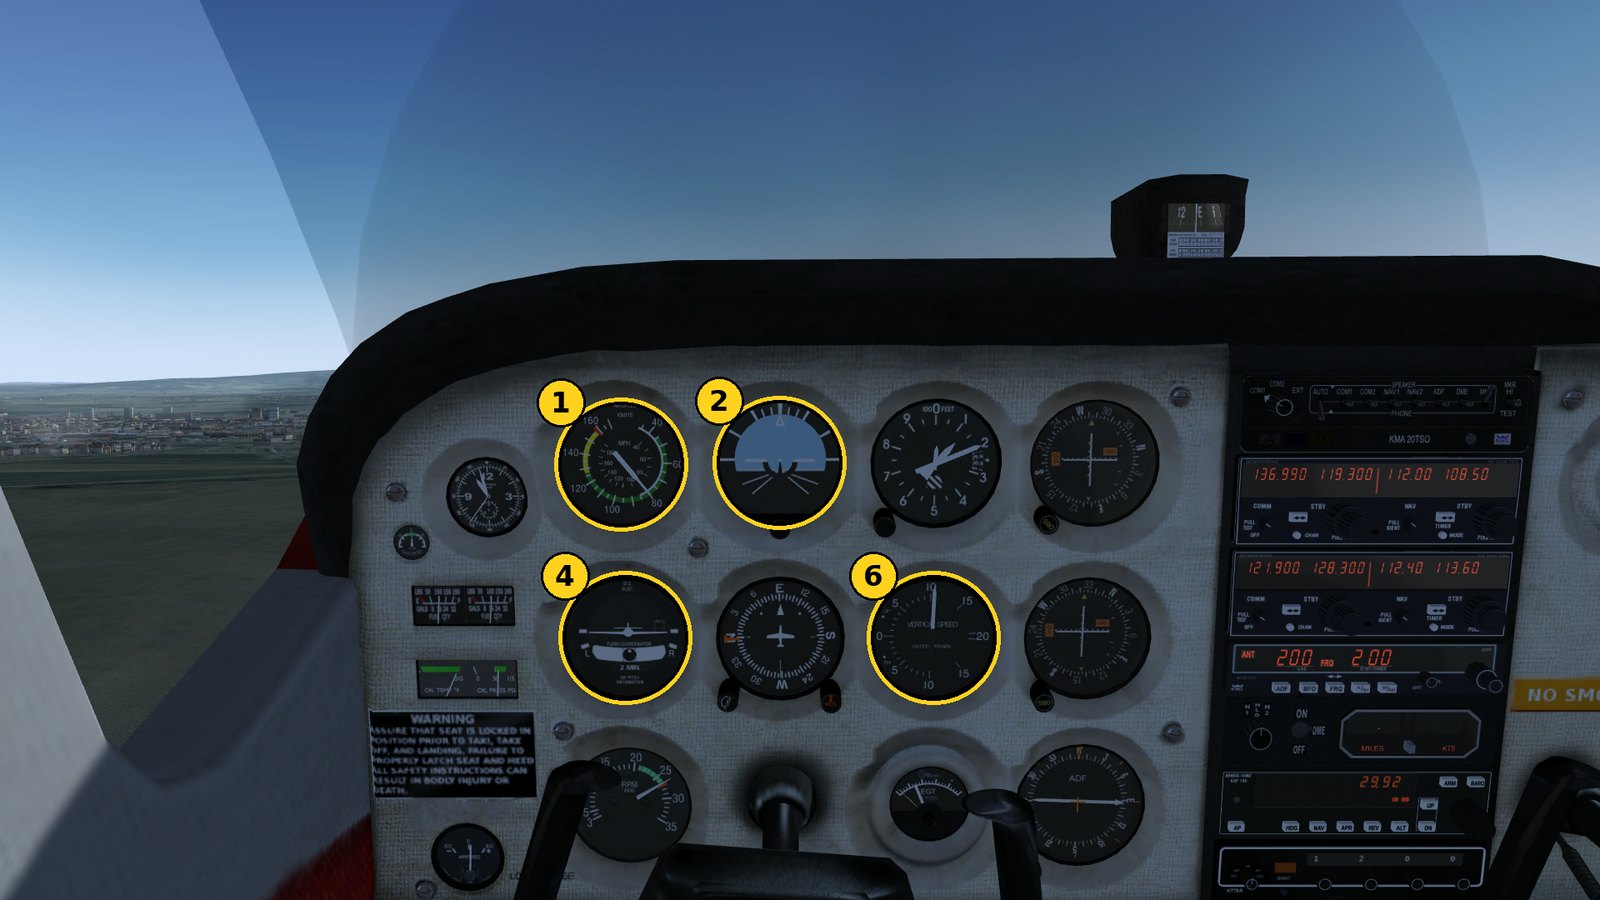
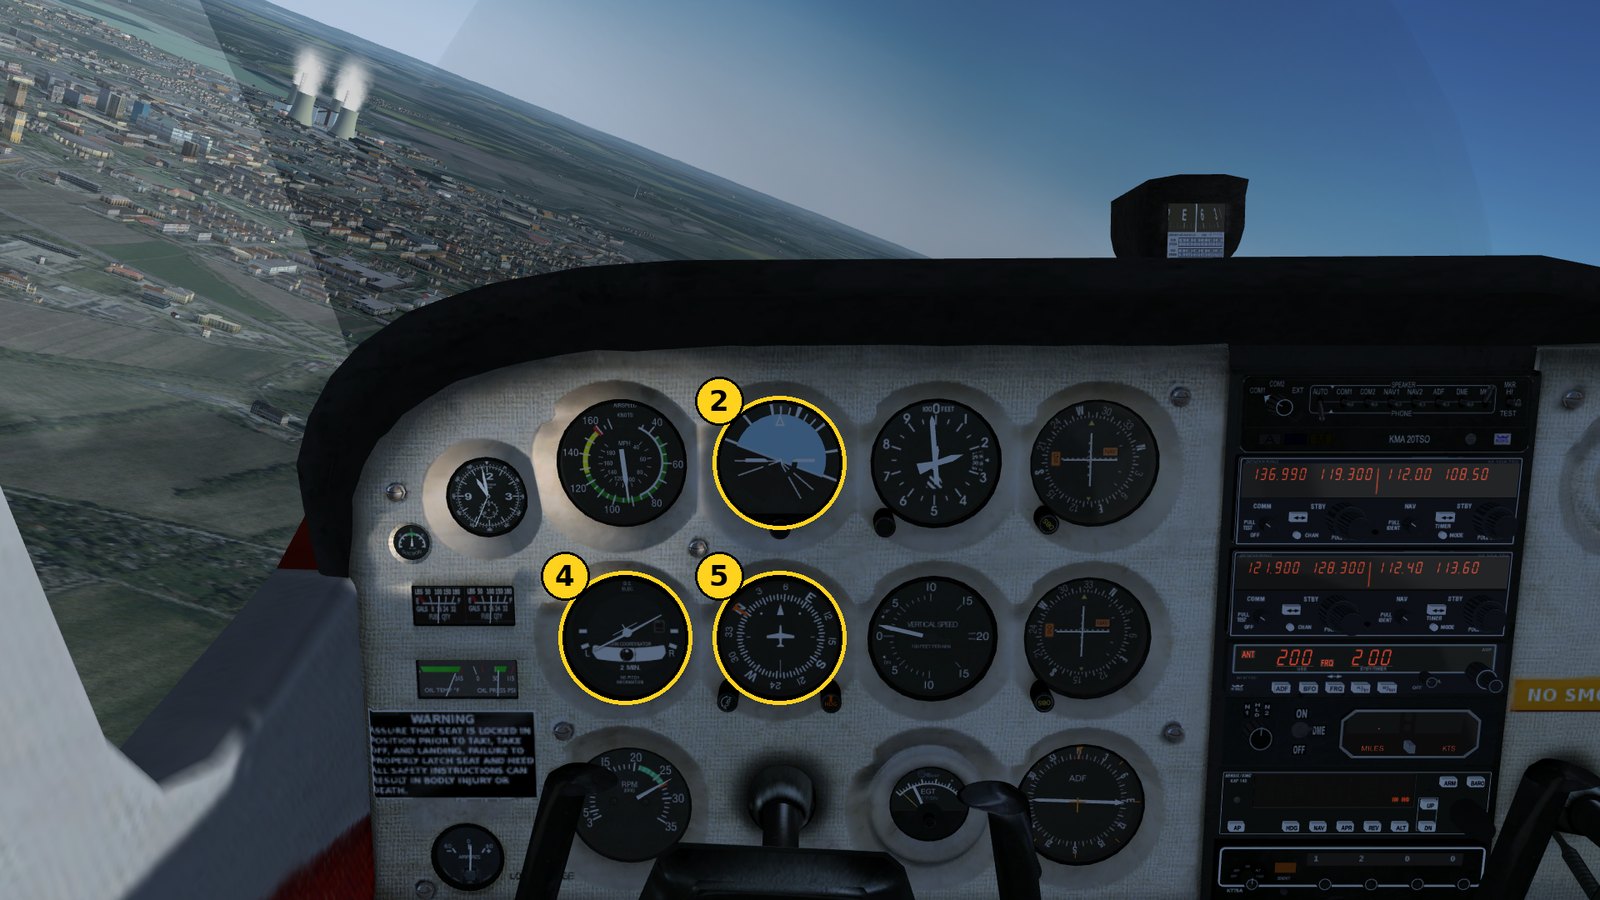
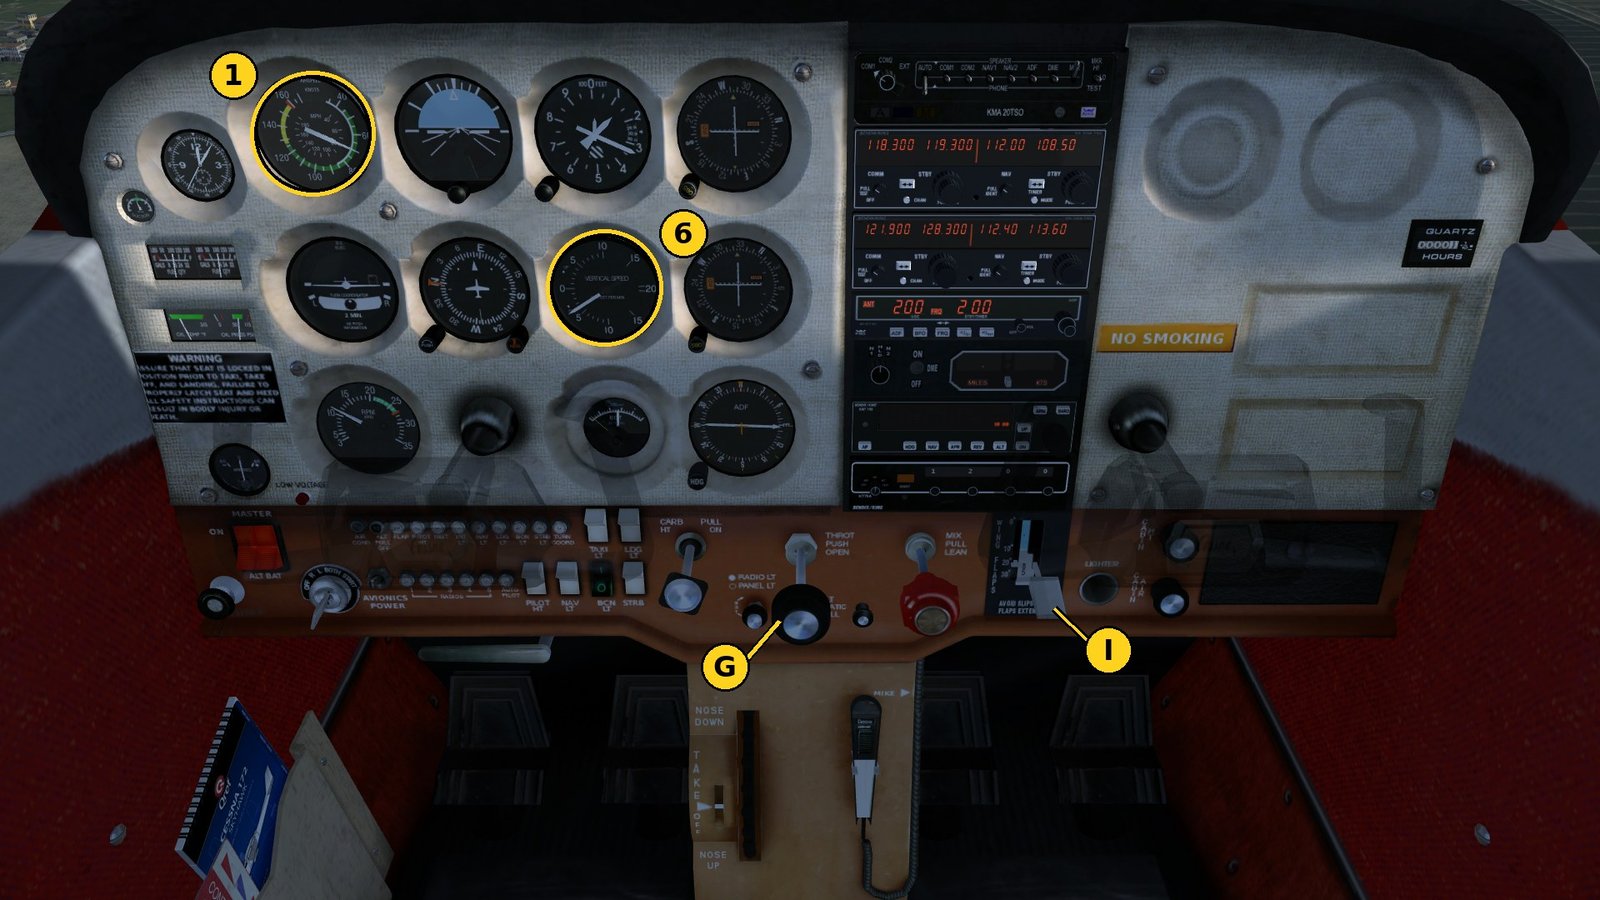
The six flight instruments sit the same way in every light aircraft, in the “basic T”: top row speed, attitude, altitude; bottom row turn coordinator, heading, vertical speed.
No. |
Instrument |
What to watch |
|---|---|---|
1 |
Airspeed indicator |
speed in knots, coloured arcs |
2 |
Attitude indicator |
pitch and bank |
3 |
Altimeter |
altitude above sea level, set the pressure in the window |
4 |
Turn coordinator with ball |
rate of turn; keep the ball centred (with the pedals) |
5 |
Heading indicator |
heading; align with the magnetic compass now and then |
6 |
Vertical speed indicator |
climb and descent rate in ft/min |
7 |
Tachometer |
engine rpm |
8 |
Fuel gauges |
fuel in the left and right tank |
9 |
Oil temperature and pressure |
both in the green |
10 |
Magnetic compass |
heading without electrical power, reference for the heading indicator |
11 |
VOR indicator |
course to a navaid |
12 |
Radios |
COM for voice, NAV for navaids |
Throttle, mixture, flaps and all switches are covered below in Switches and levers. How to use the radios (12) is explained in Flight school: radio.
Switches and levers#
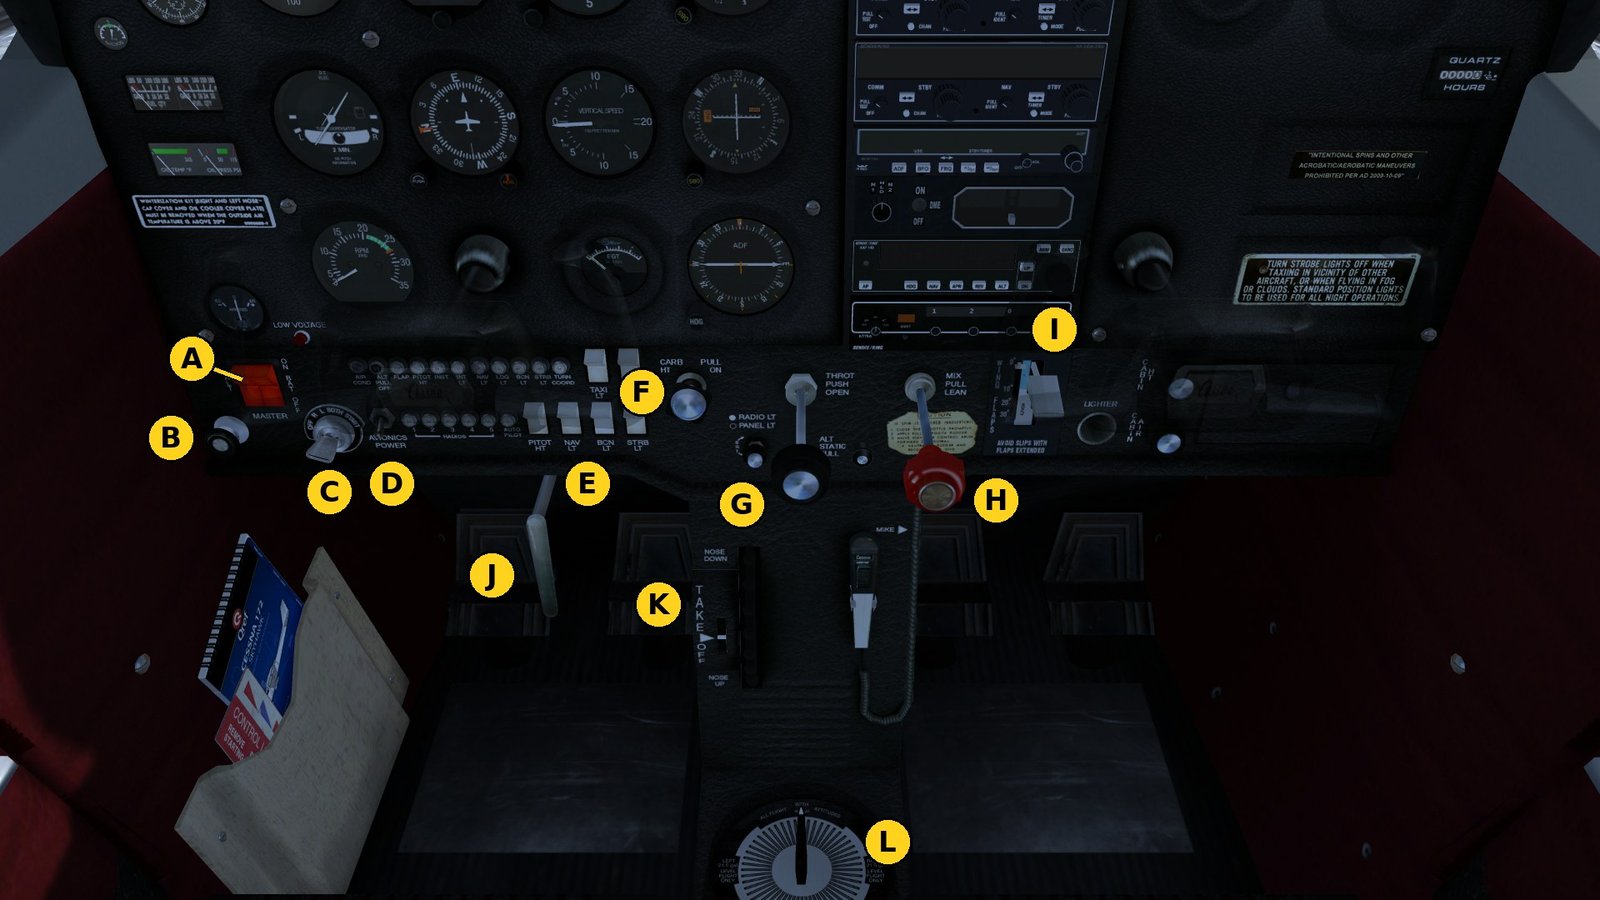
This is how the Cessna sits when you start it in FlightGear: engine off, parking brake pulled, mixture fully out. The yokes are hidden in the picture (key y), otherwise they cover the ignition and the switches. Letters mark the controls; the numbers 1–12 stay with the instruments above.
Control |
Where |
Key |
Mouse |
|
|---|---|---|---|---|
A |
Master switch (MASTER, red) |
bottom left; right half BAT = battery, left half ALT = alternator |
– |
click |
B |
Primer |
below the master switch |
– |
one click pulls it out, the next pushes it in = 1 stroke |
C |
Ignition |
next to the master switch: OFF, R, L, BOTH, START |
|
click |
D |
Avionics switch (AVIONICS POWER) |
right of the ignition |
– |
click |
E |
Light switches |
lower row PITOT HT, NAV, BCN (beacon), STRB (strobes); above TAXI, LDG |
– |
click |
F |
Carburettor heat (CARB HT) |
knob left of the throttle |
– |
click |
G |
Throttle (THROT, black) |
centre |
|
drag or mouse wheel |
H |
Mixture (MIX, red) |
right of the throttle |
|
drag or mouse wheel |
I |
Flap lever (WING FLAPS) |
right, detents 0°, 10°, 20°, 30° |
|
click |
J |
Parking brake |
handle left below the panel; pulled out = set |
|
click |
K |
Elevator trim |
wheel between the seats, TAKE OFF mark |
|
mouse wheel |
L |
Fuel selector |
on the floor between the seats, position BOTH |
– |
click |
Two helpers in the simulator: Ctrl+C shows every clickable part with its name. Help → Aircraft Checklists holds the model’s checklists; for many items a button shows where the part is in the cockpit.
Engine start#
The quick way is the menu Cessna C172P → Autostart. By hand it goes like this, in the order of the “Starting Engine” checklist:
Step |
What |
Where |
How |
|---|---|---|---|
1 |
Parking brake set |
J |
handle pulled out ( |
2 |
Fuel selector BOTH |
L |
already set at start |
3 |
Master switch on |
A |
click both halves; LOW VOLTAGE lights up while the engine is stopped |
4 |
Beacon on |
E (BCN) |
click |
5 |
Primer 3 strokes |
B |
6 clicks: out, in, out, in, out, in |
6 |
Carburettor heat cold |
F |
knob pushed in |
7 |
Throttle open a crack |
G |
press |
8 |
Mixture rich |
H |
hold |
9 |
“Clear prop!” |
look ahead |
|
10 |
Start |
C |
hold |
11 |
Check oil pressure |
9 |
in the green within 30 s |
12 |
Avionics on |
D |
radios come on |
13 |
Set rpm |
7, G |
about 1000 rpm with the throttle to warm up |
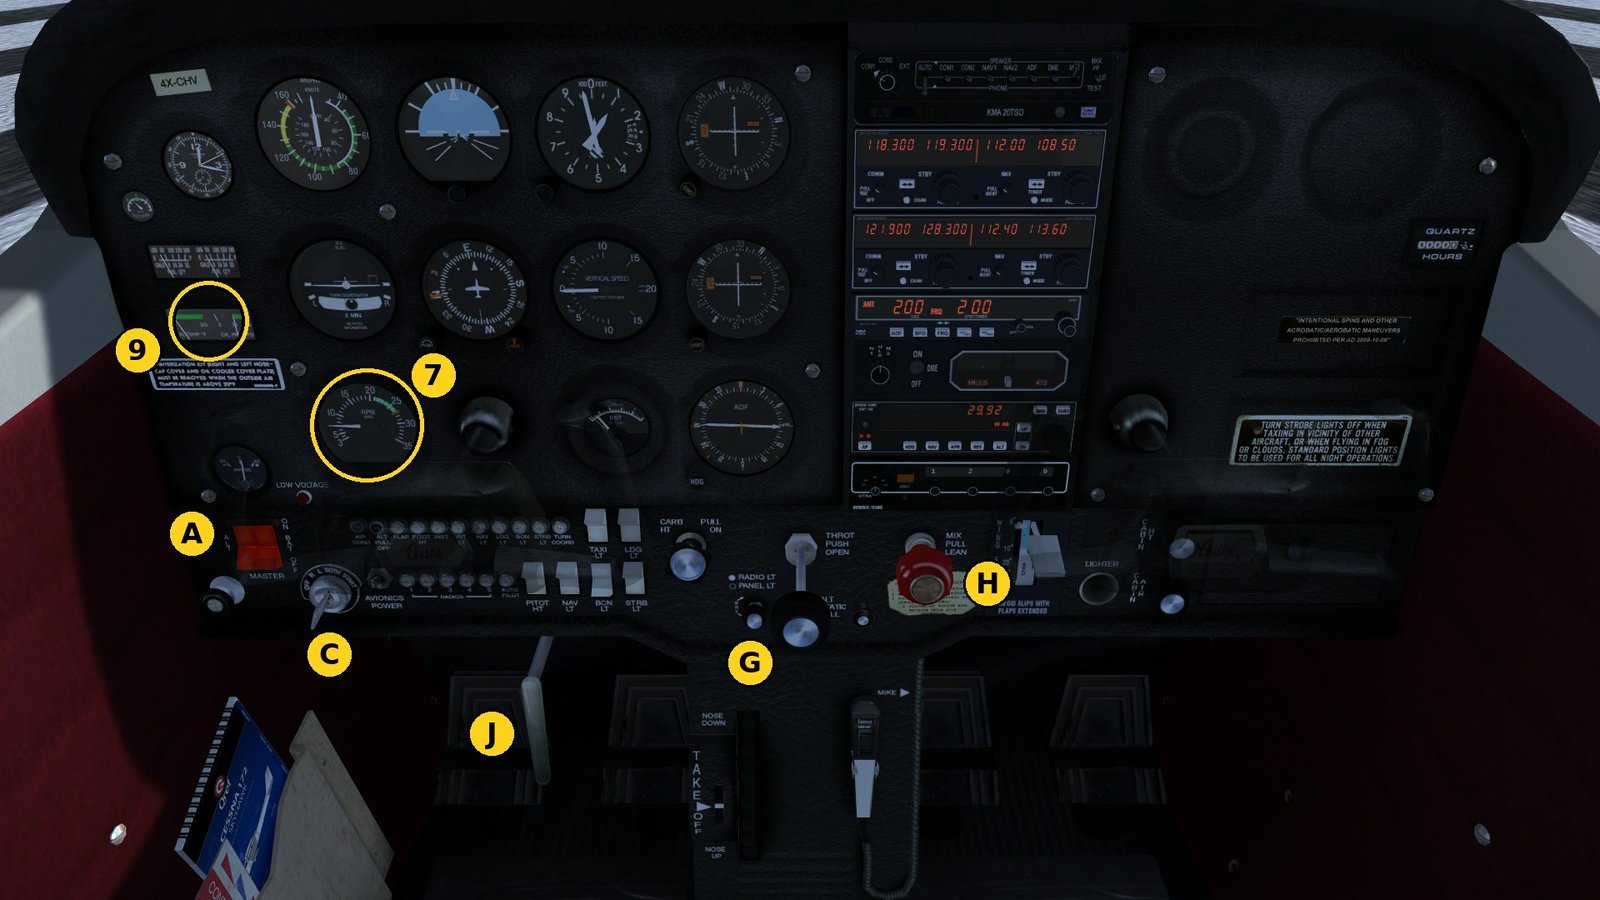
With a cold engine the model wants the primer. If the engine does not start, a message appears at the top:
Message |
Meaning |
Fix |
|---|---|---|
Use the primer! |
fewer than 3 strokes |
release the starter, prime, start again |
Flooded engine! |
more than 6 strokes, the engine is flooded |
release the starter; 5 s later the model resets the strokes, then start over with 3 strokes |
Check the throttle! |
primer is fine, but still no ignitable mixture |
open the throttle a crack, mixture fully in |
Takeoff#
Taxiing: release the parking brake (B), a little power, steer with the pedals (rudder: 0 left and Enter right on the keypad, a joystick or pedals work better), brake with b.
On the runway, before adding power:
Item |
Where |
Setting |
|---|---|---|
Flaps |
I |
0° |
Trim |
K |
TAKE OFF mark |
Mixture |
H |
rich (fully in) |
Carburettor heat |
F |
cold (in) |
Lights |
E |
LDG and STRB on |
Parking brake |
J |
released (handle in) |
When |
Callout |
Action |
Where / key |
|---|---|---|---|
Takeoff roll |
“Full power” |
throttle fully in, stay on the centreline with the pedals; the propeller pulls the nose left, so a little right pedal |
G: |
30 kt |
“Airspeed alive” |
airspeed (1) is moving, rpm (7) about 2200–2300, continue |
|
55 kt |
“Rotate” |
pull gently, nose about 8° up (attitude 2) |
|
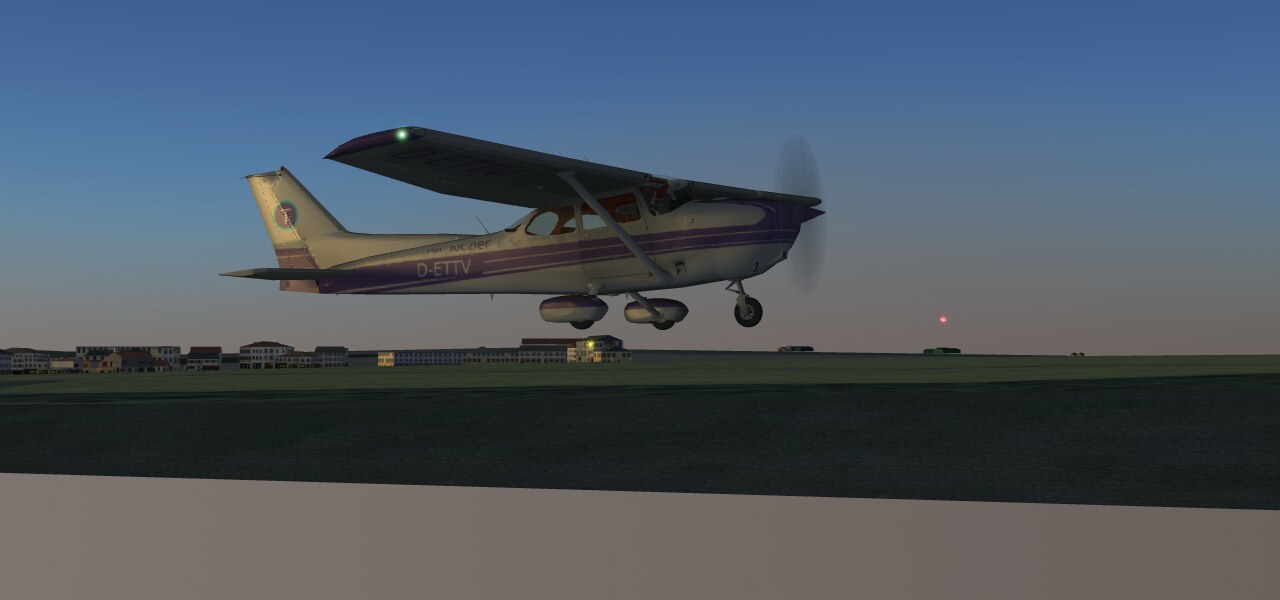
airborne |
“Positive rate” |
hold 75 kt (Vy), straight ahead to 600 ft above ground |
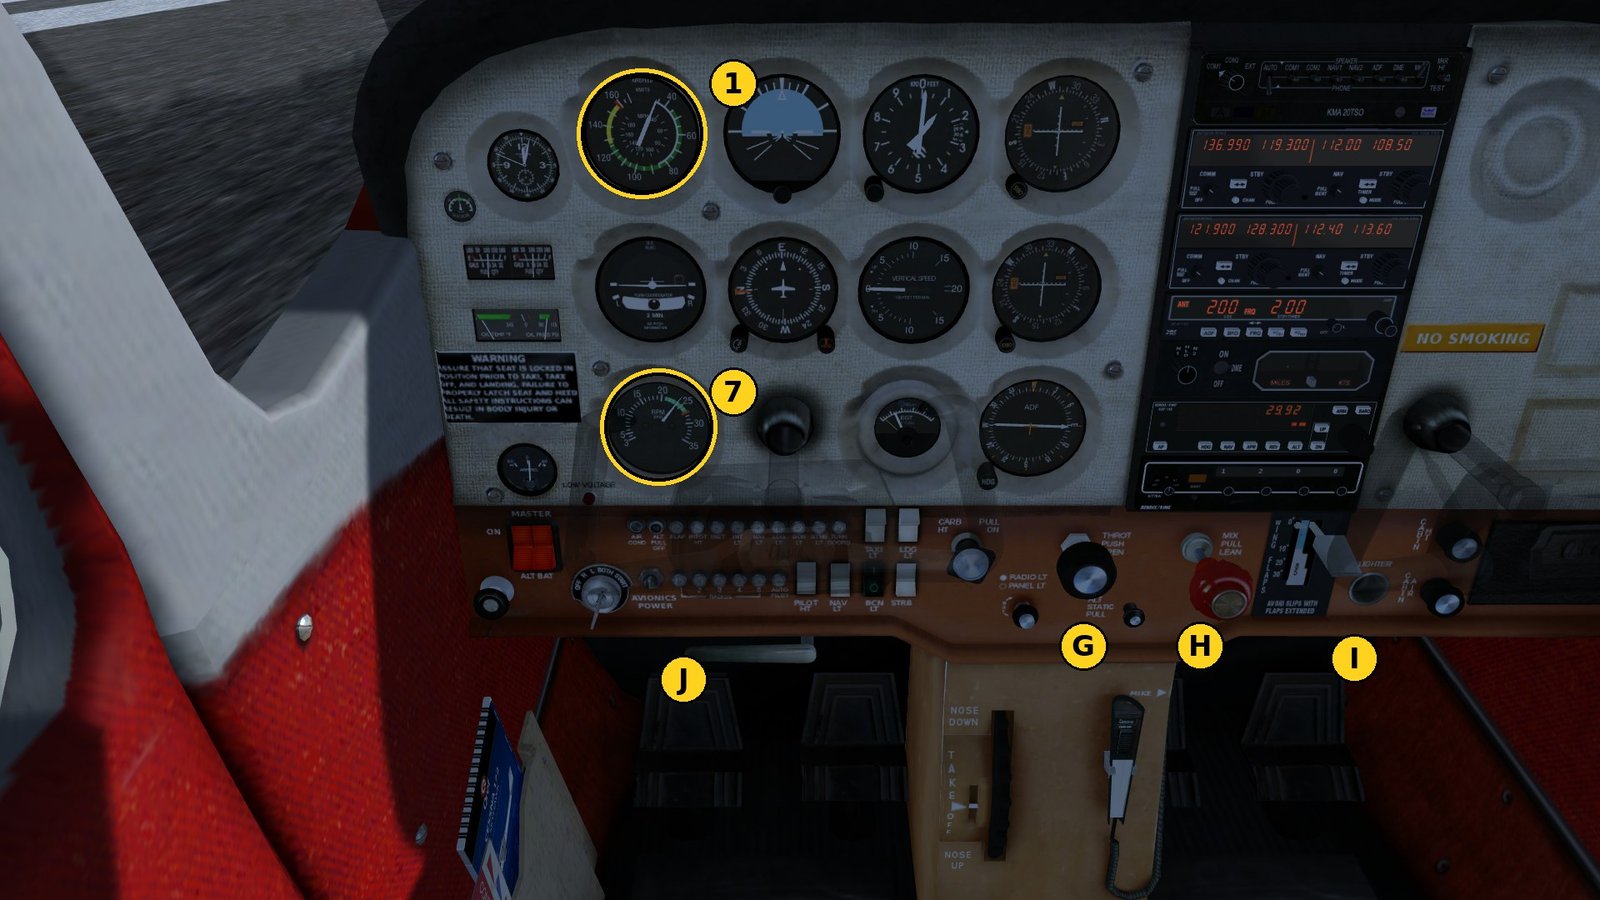
Flying it yourself: controls, trim, turns#
The script flies with a steady hand. If you fly yourself, you first have to learn which control does what. The points here come from my first own flying lessons, with a flight recorder logging every input.
Aileron and rudder#
Control |
Joystick |
Keys |
Used for |
|---|---|---|---|
Aileron |
tilt the stick sideways |
|
keep the wings level, roll into and out of turns |
Elevator |
pull / push the stick |
|
pitch, and with it speed and altitude |
Rudder |
twist the stick (or pedals) |
|
steer on the ground, keep the nose straight in the air |
In the air the aileron is the main control. If a wing drops, raise it with aileron, not with rudder. The rudder only assists: it keeps the ball in the turn coordinator (4) centred. Rule of thumb: “step on the ball”, i.e. add rudder on the side the ball slides to.
Too much rudder in the air yaws the nose sideways. The outer wing then moves faster and the aircraft rolls the same way. On the ground, too much deflection makes it swerve. So keep inputs small.
The propeller pulls to the left#
Seen from the cockpit, the propeller turns clockwise. With high power and low speed, i.e. on the takeoff roll and in the climb, it pulls the nose to the left. Counter it with light, steady right rudder, not aileron. With aileron the right wing hangs low, the aircraft slips sideways through the air and climbs worse.
In cruise, with less power and more speed, hardly any rudder is needed, in the descent almost none. The 172P has no rudder trim, and neither does the FlightGear model.
Trimming#
Every speed needs a certain elevator position. Without trim you hold it by hand all the time and the nose oscillates: on my second flight the trim stayed near zero the whole time, the vertical speed swung between −1200 and +1200 ft/min, the speed between 60 and 93 kt, and the Cessna climbed 1100 ft without my meaning to.
The right way:
Set the attitude with the elevator, for example nose on the horizon and power at about 2300 rpm.
Wait a few seconds until the speed settles.
Use the trim to take the pressure off the stick.
Let go of the stick. If nose and altitude stay put, it is right; otherwise trim again.
Attitude with the stick first, then pressure off with the trim. You do not steer with the trim, and you do not trim in turns. Before takeoff it is set to the TAKE OFF mark (K). FlightGear shows the current trim value at the top while you change it; a single press changes only a little.
Flying turns#
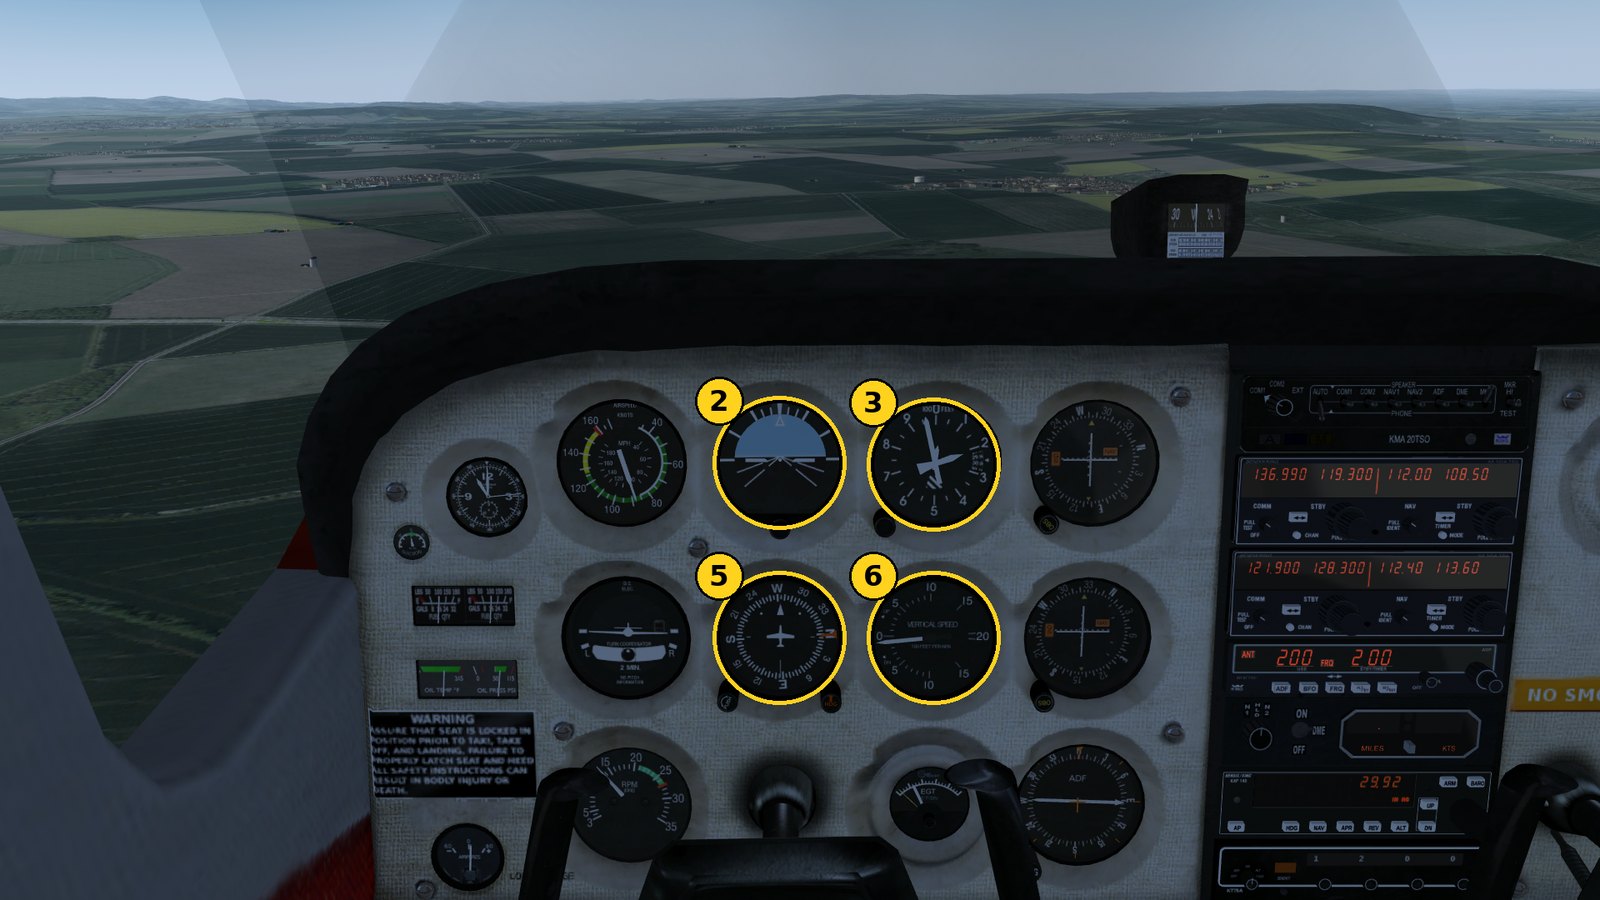
Step |
What to do |
What to watch |
|---|---|---|
Roll in |
tilt the stick slightly, a little rudder in the direction of the turn |
bank on the attitude indicator (2) |
Bank reached |
at 20° bring the stick back to centre, the bank stays |
attitude (2), ball centred (4) |
In the turn |
pull slightly, otherwise the nose drops and you lose height |
altimeter (3), vertical speed (6) |
Roll out |
about 10° before the target heading tilt the other way, centre at 0° bank |
heading indicator (5) |
Afterwards |
release the back pressure again, otherwise you climb |
vertical speed (6) |
At 20° bank and 90 kt the Cessna turns a little over 4° per second, so a 90° turn takes just over 20 seconds. The standard rate of 3° per second needs only about 15° of bank at 90 kt.
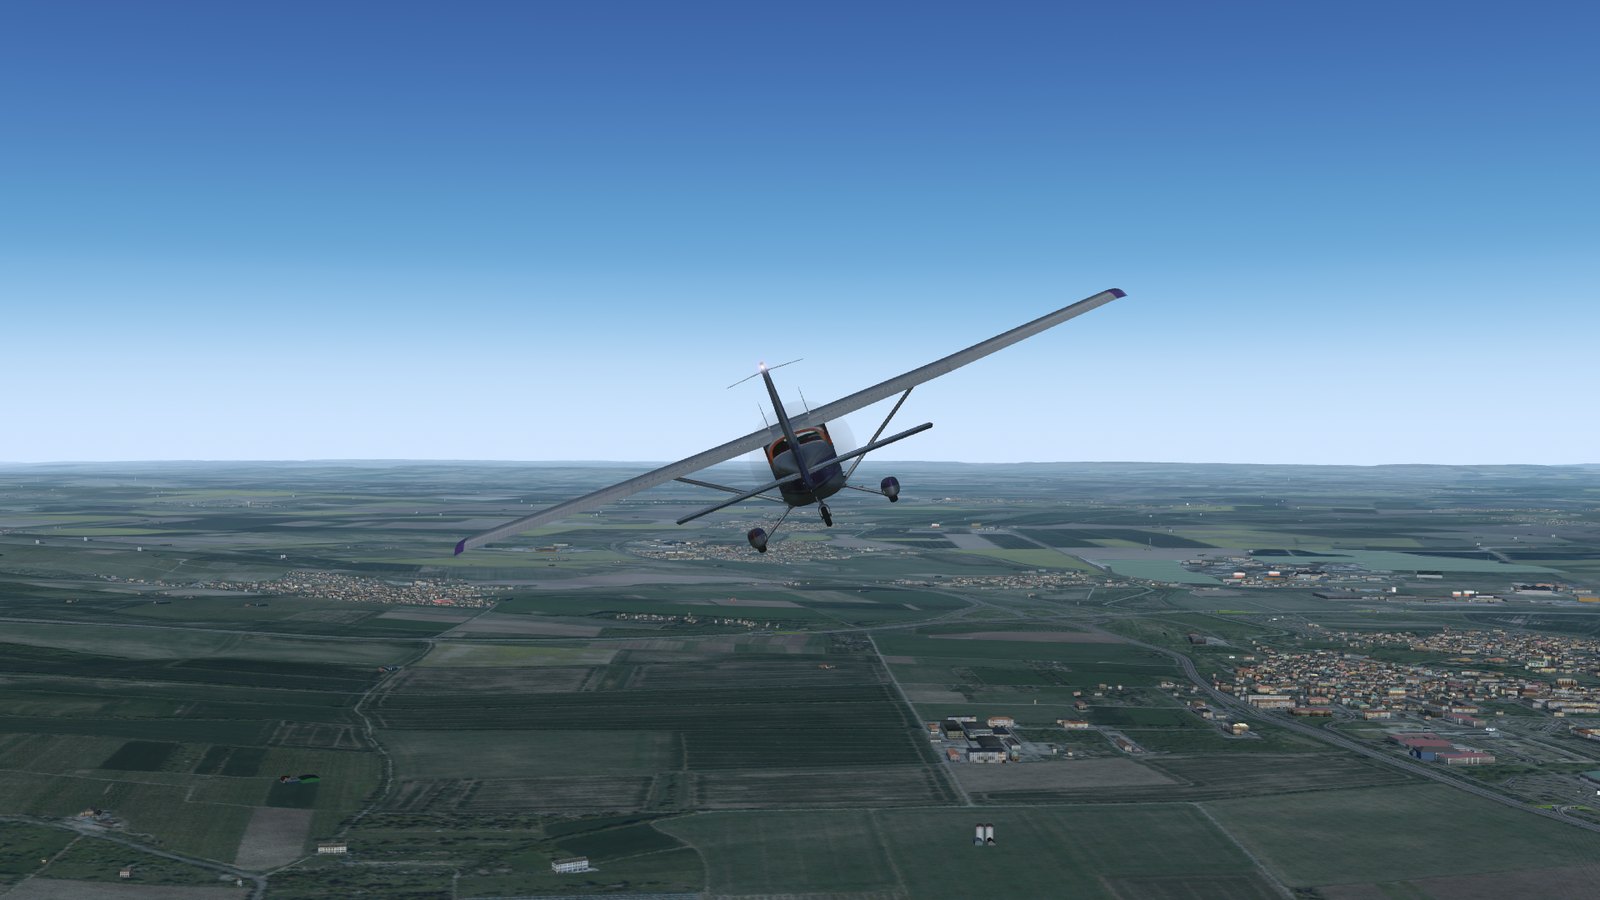
More bank is dangerous: from about 30° on you need much more back pressure to hold altitude. If you let the nose drop, the turn gets tighter and faster and a spiral dive begins. The fix: level the wings with aileron first, then pull.
Limits for beginners#
Value |
Limit |
|---|---|
Bank |
20° at most, never more than 30° |
Pitch |
not above about 12° in the climb |
Speed without flaps |
not below 65 kt, below that there is little margin to the stall |
Close to the ground |
do not pull the power all the way back, do not raise the nose to save speed |
Typical mistakes from my first lessons#
What happened |
Measured |
Better |
|---|---|---|
turns too steep |
up to 56° bank, up to 2460 ft/min descent, from 580 down to 90 ft above ground |
20° bank at most, pull slightly in the turn |
countered the left pull with aileron |
rudder at zero in the climb |
twist slightly right in the climb, do not tilt |
then only used rudder |
aileron at zero for minutes, constant left bank up to 28°, a full circle by accident |
keep the wings level with aileron, rudder only in addition |
not trimmed |
vertical speed ±1200 ft/min, altitude +1100 ft by accident |
trim after every change of attitude |
pulled up too steeply |
nose 26°, speed dropped to 53 kt |
nose 12° at most, speed not below 65 kt |
slow with the nose high, power fully off, close to the ground |
54 kt, nose 12°, 110 ft above ground |
keep some power low down, hold the speed |
turned while rolling out |
turned through 120° to 140°, ended up tilted |
after touchdown stay straight with small rudder inputs, brake evenly |
With a joystick#
A joystick is much finer than the keys. I use a Thrustmaster T.Flight Hotas X: tilting the stick is aileron, pulling and pushing is elevator, twisting is rudder, the throttle lever is the power. The trigger (1) brakes. The two trim buttons are button 4 on top of the stick head and button 3 on the front of the head above the trigger. Button 4 on top trims the nose up, button 3 on the front trims it down. In the supplied mapping both are named “Elevator trim down”, which is wrong for button 4. The trim display shows a negative value for nose up: the flight model adds the trim to the elevator, and negative there means elevator up.
Out of the box the stick responds linearly: a small movement already gives noticeable control deflection. A response curve (power) makes it finer around the centre while still reaching full deflection, and a small dead band (dead-band) stops jitter. Copy the mapping from fgdata/Input/Joysticks/ThrustMaster/T-Flight-Hotas-X.xml to Input/Joysticks/ThrustMaster/ in your own FlightGear folder (Linux ~/.fgfs, Windows %APPDATA%\flightgear.org) and change the three axes there:
<axis n="0">
   <desc>Joystick: Aileron</desc>
   <dead-band type="double">0.02</dead-band>
   <binding>
      <command>property-scale</command>
      <property>/controls/flight/aileron</property>
      <factor type="double">1.0</factor>
      <power type="double">2.0</power>
   </binding>
</axis>

<axis n="1">
   <desc>Joystick: Elevator</desc>
   <dead-band type="double">0.02</dead-band>
   <binding>
      <command>property-scale</command>
      <property>/controls/flight/elevator</property>
      <factor type="double">-1.0</factor>
      <power type="double">2.0</power>
   </binding>
</axis>

<axis n="3">
   <desc>Rudder</desc>
   <dead-band type="double">0.04</dead-band>
   <binding>
      <command>property-scale</command>
      <property>/controls/flight/rudder</property>
      <power type="double">1.6</power>
   </binding>
</axis>
With power 2.0, half deflection gives only a quarter of the control movement. Other joysticks have their own files in the same folder; the axes look just the same there.
Recording your own flights#
Afterwards, numbers show best what went wrong. This script writes one line per second to a CSV file during the flight. It needs fg_steuerung.py from Control with Python and only reads, it controls nothing:
import csv, time
from fg_steuerung import Fg

VALUES = {"altitude_ft": "/position/altitude-ft", "speed_kt": "/velocities/airspeed-kt",
          "climb_fpm": "/velocities/vertical-speed-fps", "pitch": "/orientation/pitch-deg",
          "bank": "/orientation/roll-deg", "heading": "/orientation/heading-deg",
          "aileron": "/controls/flight/aileron", "rudder": "/controls/flight/rudder",
          "trim": "/controls/flight/elevator-trim"}

fg = Fg()
with open("flight.csv", "w", newline="") as f:
    w = csv.writer(f)
    w.writerow(["time"] + list(VALUES))
    start = time.time()
    while True:
        row = [round(time.time() - start, 1)]
        for name, path in VALUES.items():
            value = float(fg.get(path) or 0)
            row.append(round(value * 60 if name == "climb_fpm" else value, 2))
        w.writerow(row)
        f.flush()
        time.sleep(1)
Each query waits for the next tick of the telnet server. With a few values and --telnet=socket,bi,20,… from the start script that is enough for one line per second. With 26 values and only 10 ticks per second I got just one line every 5.6 seconds. Stop it with Ctrl+C; the file opens in any spreadsheet program.
Traffic pattern#
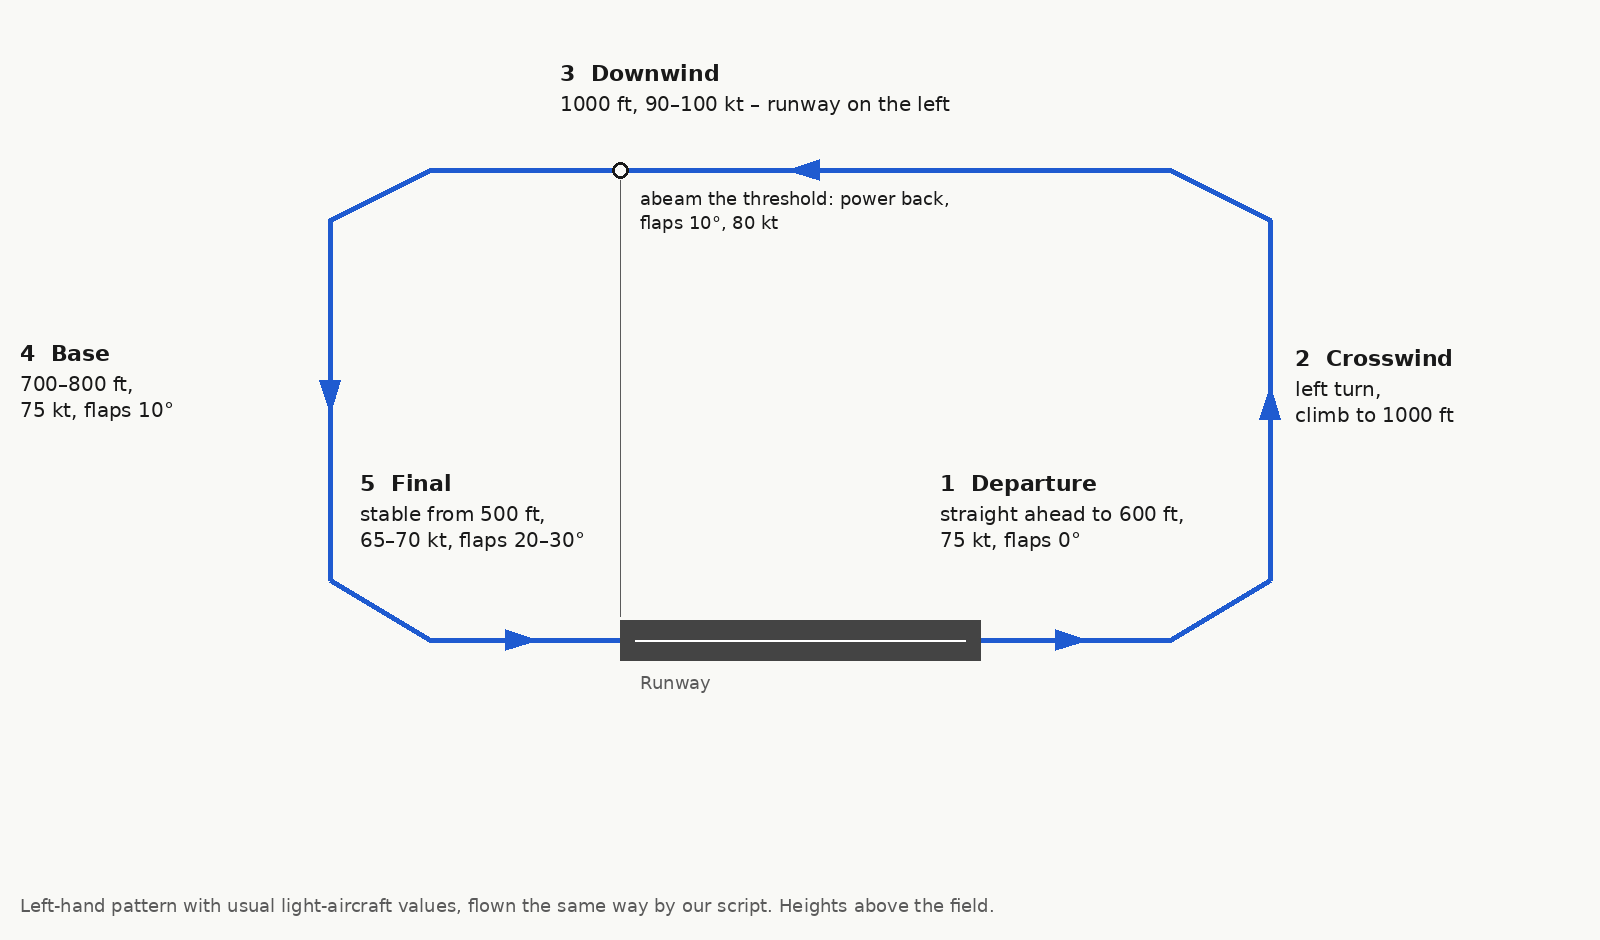
Usual practice for light aircraft, and how our script flies it: pattern altitude 1000 ft above the field, downwind at cruise speed or a little less, flaps 10° and descend on base, flaps 20°–30° on final.
Leg |
Height above ground |
Speed |
Flaps |
|---|---|---|---|
Departure |
straight to 600 ft, then turn |
75 kt |
0° |
Downwind |
1000 ft |
90–100 kt |
0° |
abeam threshold |
power back, descend |
80 kt |
10° |
Base |
700–800 ft |
75 kt |
10° |
Final |
stable from 500 ft |
65–70 kt |
20°–30° |
This is the pattern at Erfurt as recorded by the flight recorder. The largest bank angle in the turns was 22°, and the Cessna touched down 540 m past the threshold.
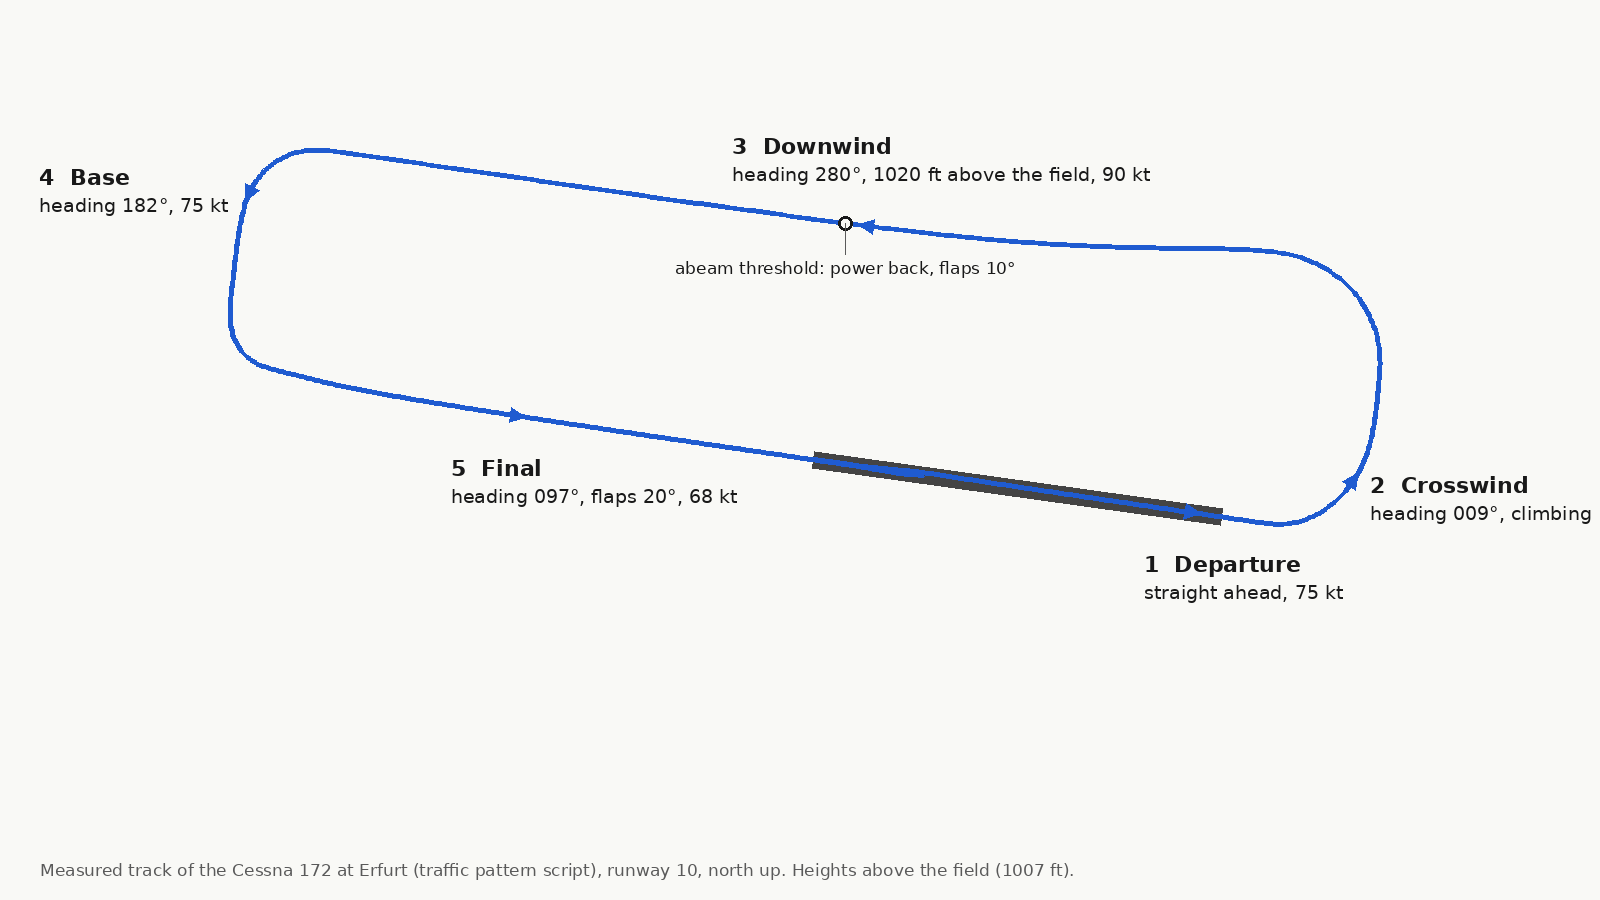
The Dash 8 flies the same shape, only larger, higher and faster; its measured track is shown there.
Which headings do you fly?#
All headings follow from the runway direction. The runway number is the heading in tens of degrees: runway 10 means about 100°, runway 28 about 280° (the same runway, other direction). In a left-hand pattern every turn is a 90° left turn, so you subtract 90° each time:
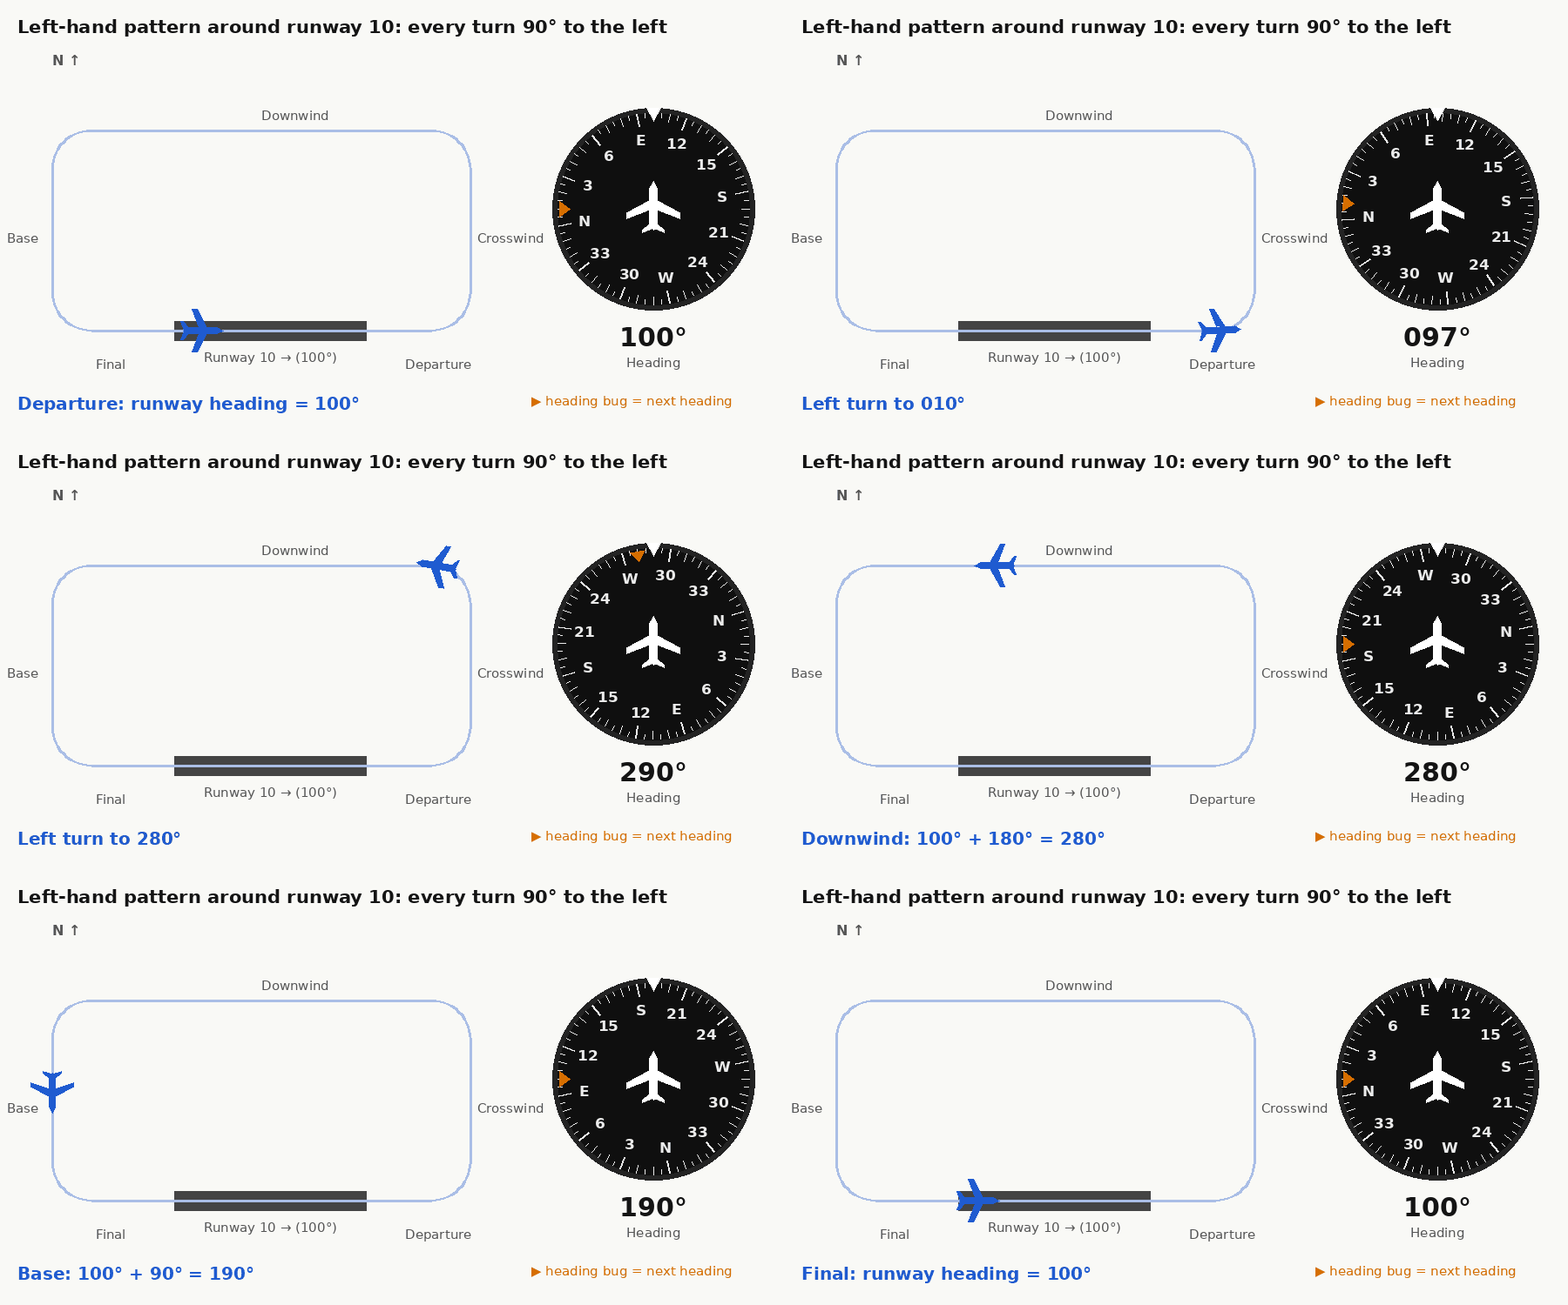
Leg |
Calculation |
Example runway 10 |
|---|---|---|
Departure |
runway heading |
100° |
Crosswind |
runway heading − 90° |
010° |
Downwind |
runway heading + 180° (reciprocal) |
280° |
Base |
runway heading + 90° |
190° |
Final |
runway heading |
100° |
In a right-hand pattern the signs are reversed (crosswind +90°, base −90°). Whether the pattern is left or right is shown on the airfield’s visual approach chart; without a note it is left. Read the heading on the heading indicator (Cessna) or the EHSI (Dash 8) and set the heading bug (HDG knob) to the next heading, so you can see in the turn when to roll out.
When to turn:
Turn |
When |
|---|---|
onto crosswind |
past the end of the runway, once the departure height is reached |
onto downwind |
at the right distance from the runway (light aircraft usually 0.5–1 nm, the Dash 8 in the script 1.5 nm); downwind runs parallel to the runway |
onto base |
when the threshold is about 45° behind you (over your left shoulder) |
onto final |
early enough to roll out exactly on the extended centreline |
A 90° turn at standard rate (3° per second) takes 30 seconds. In a crosswind the headings are meant over the ground: the nose then points into the wind by the drift angle (see Crosswind).
Approach#
Criterion |
Limit |
|---|---|
Glide path |
3°, about 350–400 ft/min at 70 kt |
Decision |
at 200 ft above ground: on the centreline and on the path, otherwise go around |
Speed |
68 kt with flaps 20°, not slower than 60 kt |
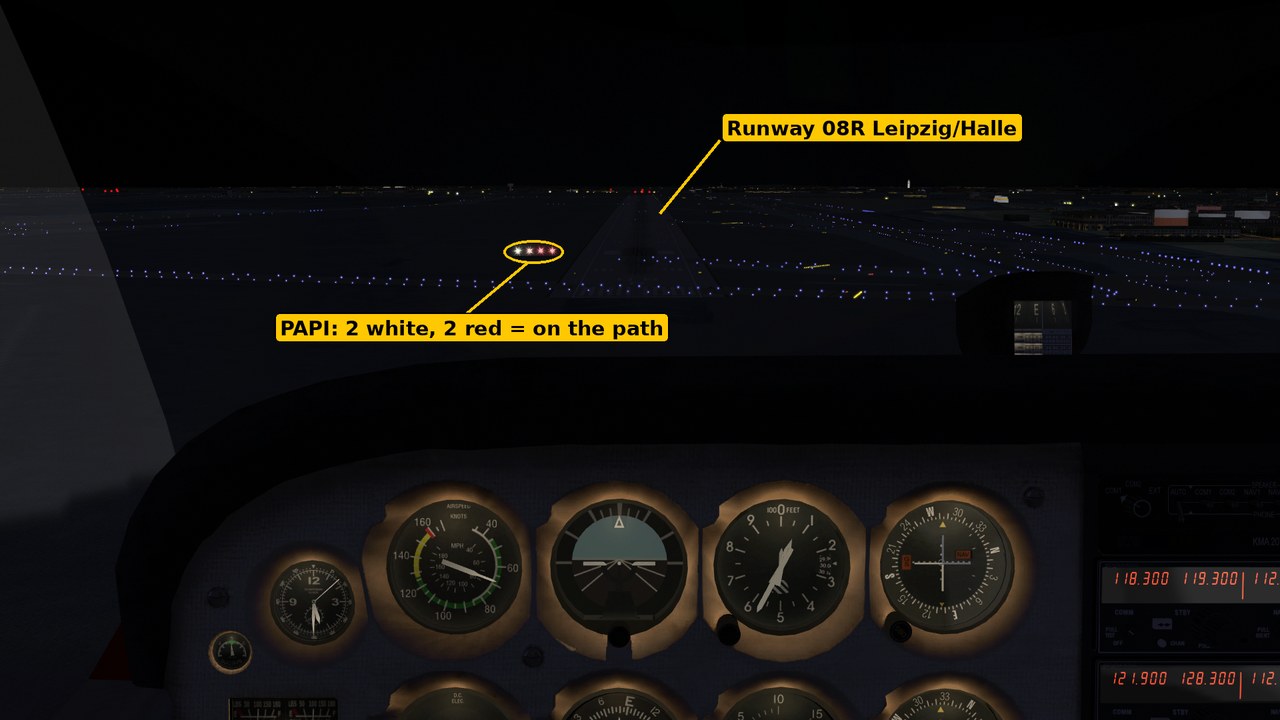
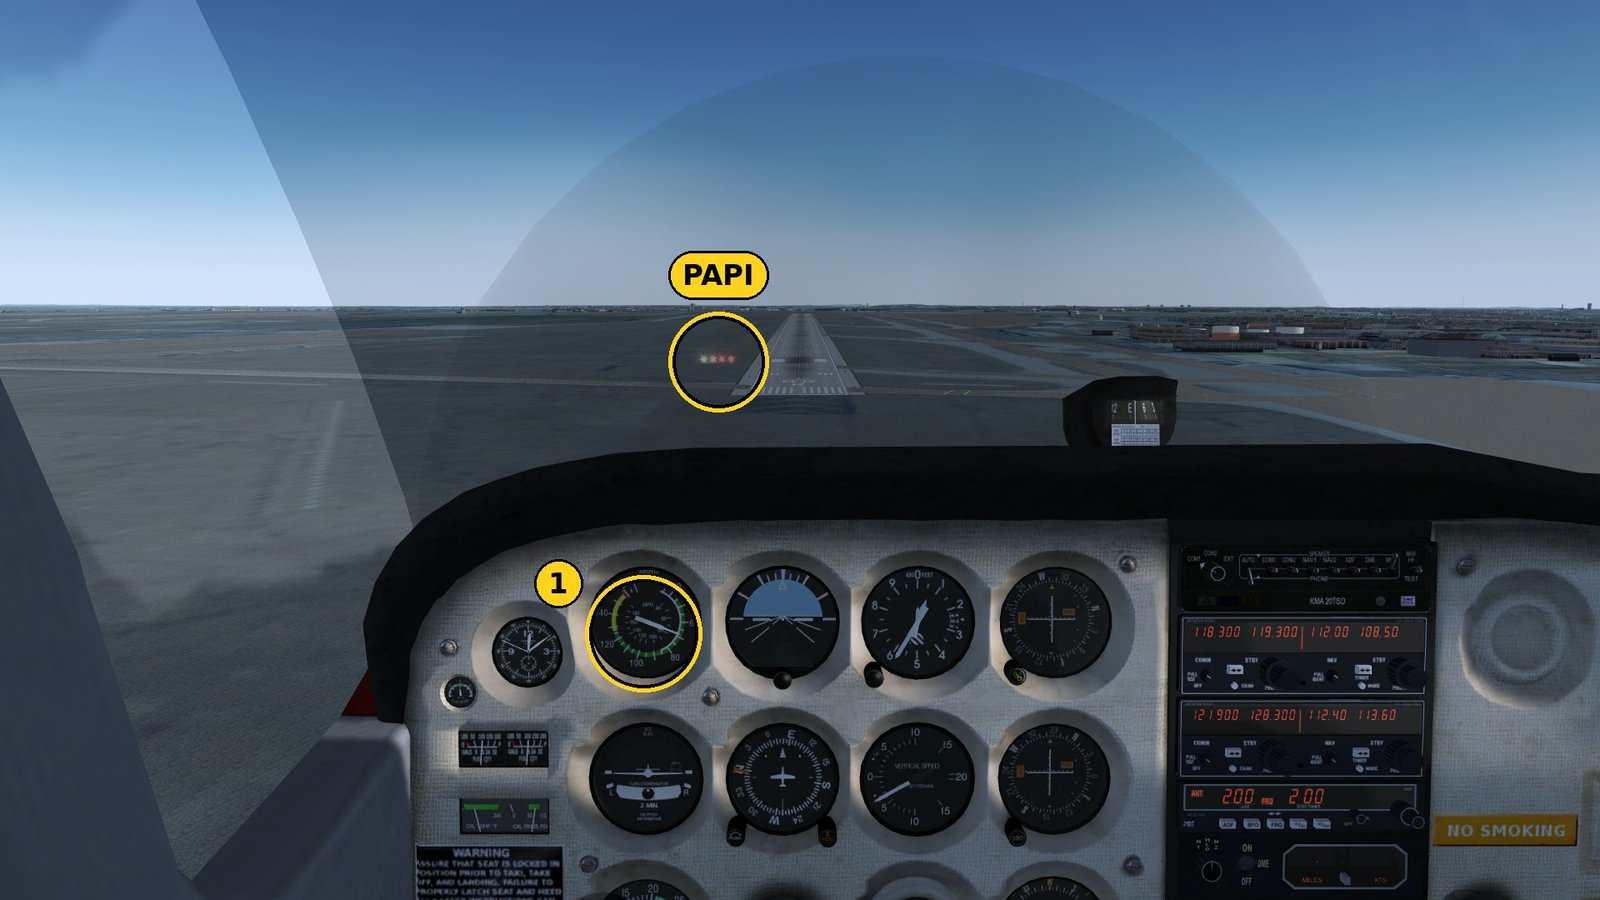
PAPI |
2 white, 2 red (all colours explained in Flight school: Dash 8) |
The script measures the threshold elevation in the loaded scenery instead of trusting the chart: in Leipzig runway 08R lies about 50 ft below the field elevation in the airport data. With the chart value the Cessna flew the whole approach too high (PAPI 4× white). The aim point is abeam the PAPI, about 360 m past the threshold.
Landing#
When |
Action |
|---|---|
about 10–20 ft |
flare: throttle fully out, raise the nose slowly |
Touchdown |
on the main wheels, keep the nosewheel up |
Nosewheel down |
brake, stay on the centreline |
Crosswind#
As with the Dash 8: crab on final (nose into the wind), in the flare lower the upwind wing and align the nose with the runway using the rudder. After touchdown full aileron into the wind. The Cessna is light and feels gusts more; in gusty wind fly a few knots faster on final.
Go-around#
Full power, nose to climb attitude, retract flaps step by step to 10° once the aircraft climbs, continue climbing at 75 kt.
Quick reference#
Phase |
Numbers |
|---|---|
Takeoff |
full power, VR 55 kt, climb at 75 kt |
Cruise |
100 kt, bank up to 20° |
Approach |
flaps 10° at 75 kt, from 3 nm flaps 20° at 68 kt |
Landing |
decision 200 ft, flare 10–20 ft, main wheels first |